
I’m making my own backpack for my upcoming CDT hike. In this series of three blog posts, I will show you the entire process, from design and materials, through the construction process to the finished package. Welcome to the world of MYOG: How to create your own team.
Because?
First of all, why bother? It’s a lot of effort compared to walking into a store or ordering online while lying in bed or soaking in the bathtub. I have several motivations behind DIY:
- You have complete freedom over what you make: features, materials, colors and size. Prefabricated kits are a careful balance between the requirements of a wide variety of people and the commercial aspects of kit manufacturing. Unless you pay for a custom kit, you should follow the design decisions that were made on that kit. When you go to MYOG, you are the person making those decisions and the end result is up to you.
- I really enjoy the process of designing and making things, so this is a hobby that tickles my fancy. Holding something you’ve invested a lot of time and effort into is very satisfying, even more so when you can use it on your outdoor adventures. Learning how to use a sewing machine and how clothing and equipment are made also gives them a whole new perspective as objects. So far I have made tarps, backpacks, fanny packs and sleeping quilts.
- I love browsing outdoor stores and websites for gear as much as the next person, but purchasing your stuff this way can sometimes feel transactional. When making equipment, I feel a real sense of ownership when I use it. This also means acknowledging mistakes in design and construction: I did a poor job reinforcing a carrying loop on my last backpack, and the straps and most of the stitching broke halfway up a Scottish mountain (always carry a needle and thread!).
- It CAN be cheaper than buying equipment if it’s something you commit to. If you’re starting from scratch in terms of tools, you may need to craft a few items of equipment to break even. That being said, you can make a lot of things with a basic home sewing machine. One thing to keep in mind, however, is that if you’re the type of person who places monetary value on your time, it’s probably not worth it. It can slow down the process, especially when you’re just starting out and learning.
My first proper MYOG item was this tarp. It kept me practically dry for three months on my first long hike.
Design and patterns
So how do you go from an idea to a design to something you can make? If you don’t know anything about sewing, the starting point is 2D pieces of fabric that are joined together to form a 3D object. The shape of these comes from a pattern, which is a kind of template for the pieces of fabric with all the markings necessary for production. Translating the design of a sewn object into a pattern is a true art that I have only just begun to delve into.
Fortunately, there are several MYOG hiking gear pattern creators who have done all the hard work of creating usable patterns. For this pack I decided to go with the Prickly Gorse Gear 60L Framed Ultralight Backpack. Its high capacity keeps the weight down (aiming at around 1kg) and it should be able to withstand the weight of the CDT’s long food and water transports. While the main shape, size, and configuration of the backpack is primarily set by the pattern, it offers a variety of options for things like pocket type, straps, and other additional features. The materials you choose to do it will allow you to obtain a wide variety of results. I made some modifications to the design that I will explain in the next post when I start building each component.
Layout of my work material in the design software I use when sewing. There are many duplicate pieces because I use one document to verify material quantities and to make changes to patterns.
Material selection
There is an almost overwhelming amount of outdoor fabrics to choose from. It’s easy to get caught in a cycle of indecision with these things, even if you’re used to designing things. For this package I used three criteria to help narrow down my selection:
1: Fabrics must be able to do their job in terms of performance. This generally means waterproof and quite durable. While weight is definitely a factor, I will always choose a slightly heavier material if I think it will extend the life of the backpack.
2: That performance must be achieved while still being worth it in terms of price. I’m at the stage where I’m confident enough in my sewing skills to purchase higher quality fabrics, but I’m not willing to pay a lot for diminishing returns. Sorry Challenge Ultra, you look beautiful, but I can’t justify your price given how expensive you are.
3: The most important thing is that it looks “cool”. I thought about several different color options and decided I wanted to go with tech, mostly gray, black and white, but with hints of orange. Google Lego Orange Transparent Chainsaw and you’ll get the vibe.
So I spent some time exploring Ripstop by the Roll and other outdoor fabric suppliers, reading reviews. Look at MYOG reddit and other forums for other people’s experiences with fabric sewing. For the purposes of material selection, I divided the backpack into seven areas: main body fabric (i.e. sides and back panel), front pocket, back panel, hip belt and shoulder straps, side pockets, and bottom panel.
main body
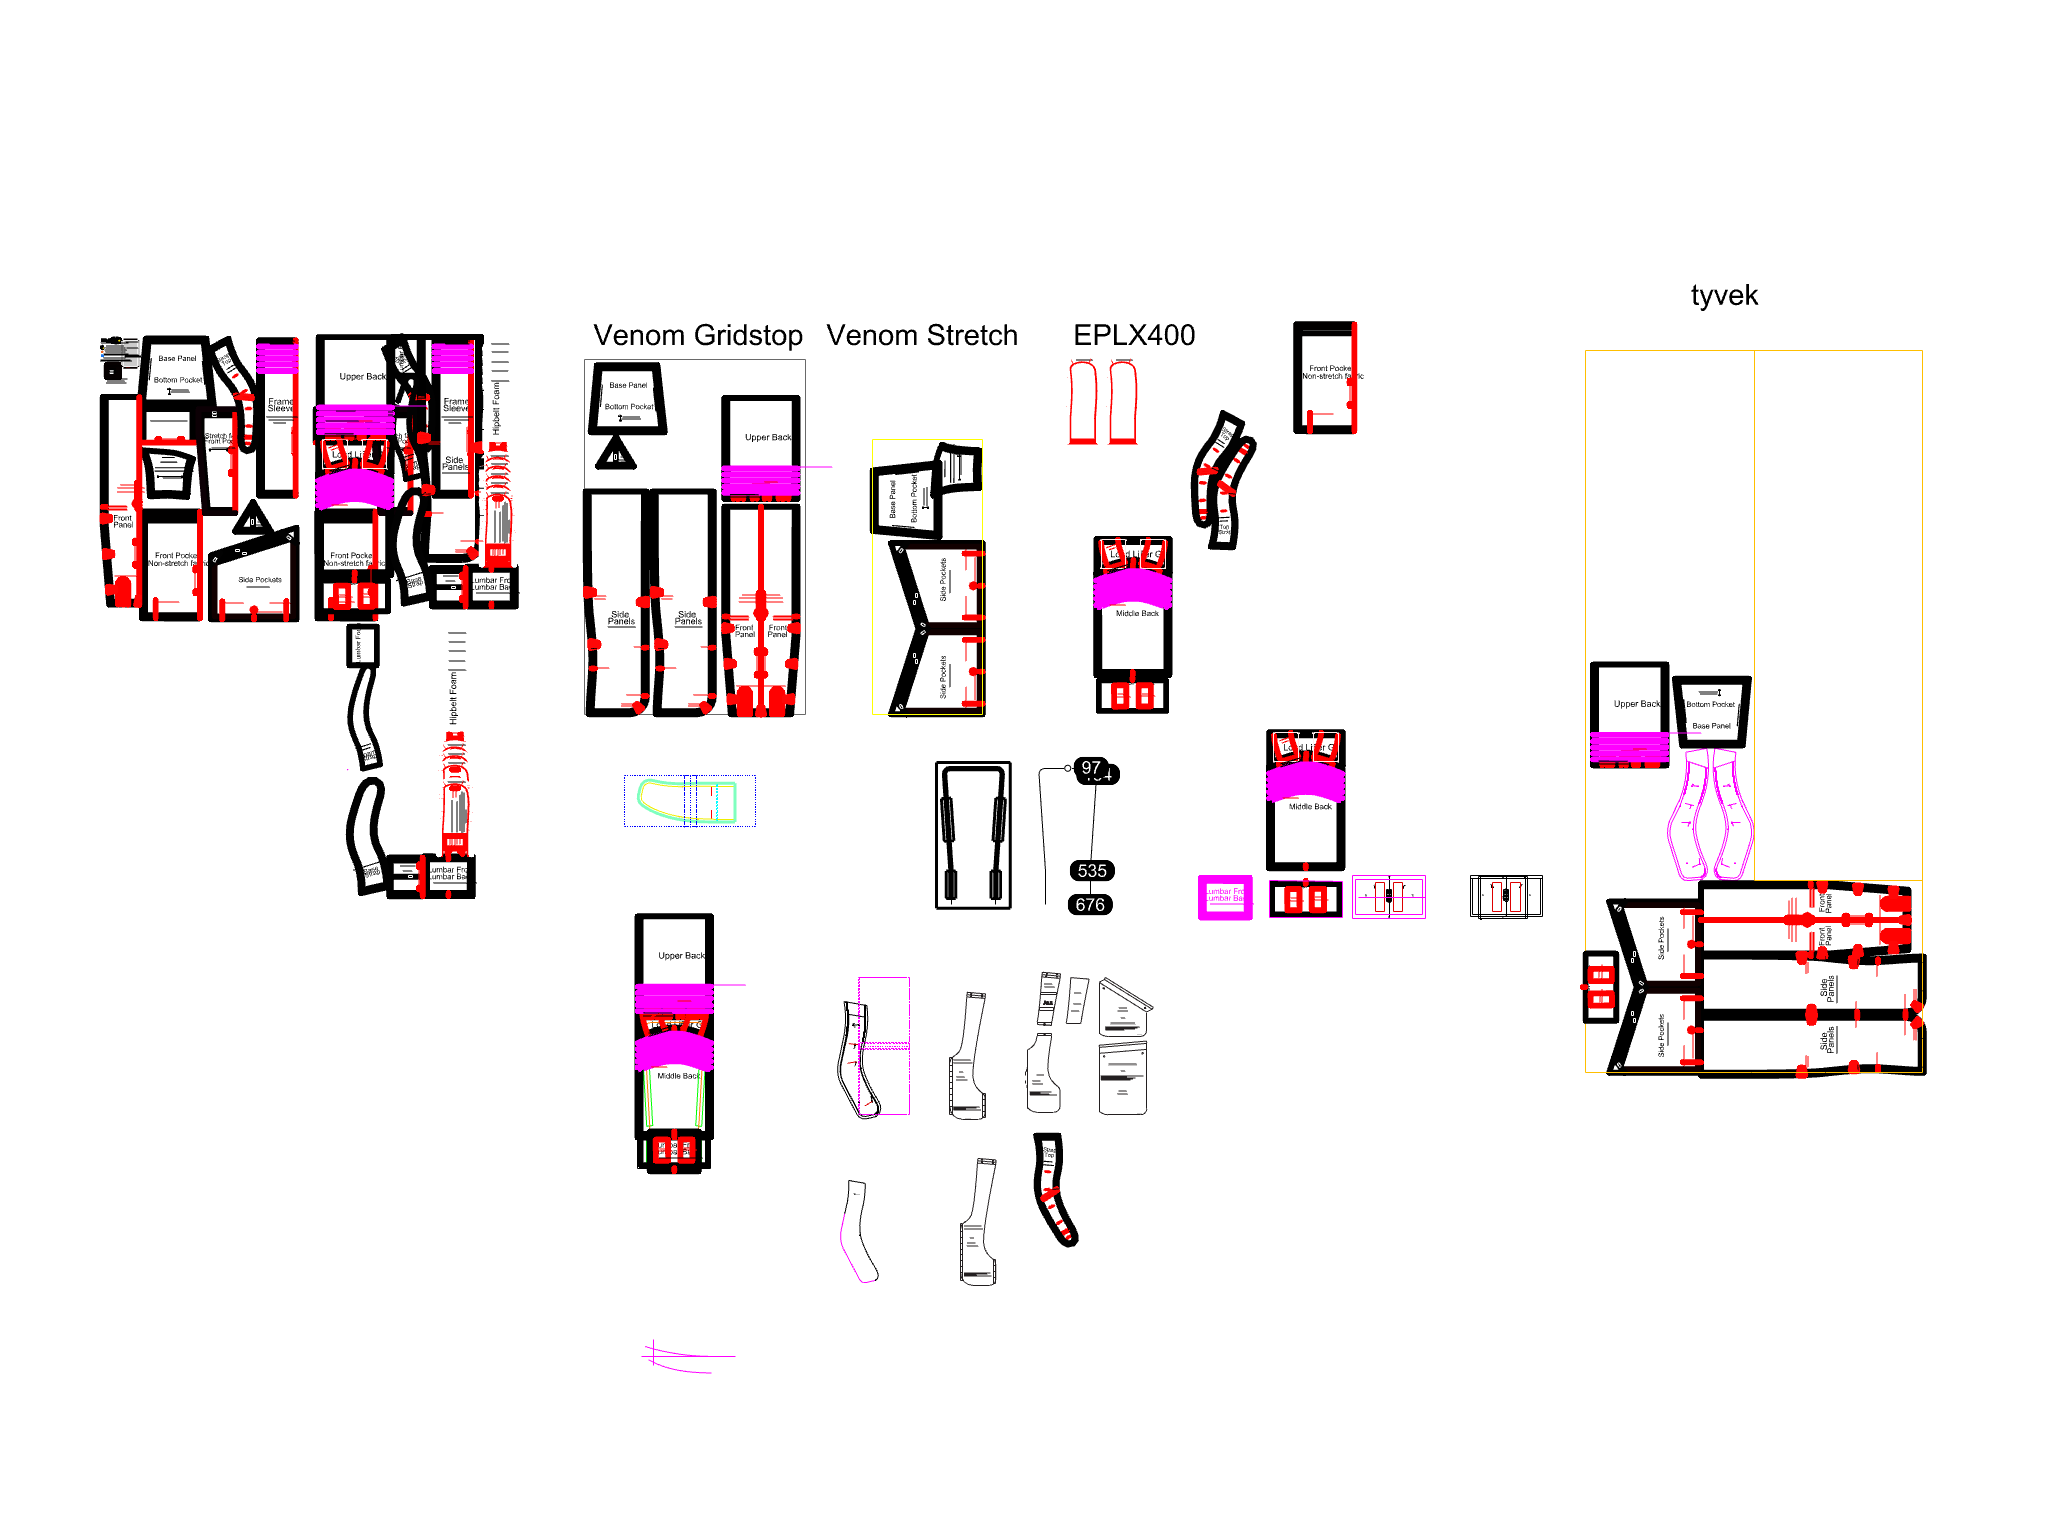
The last pack I made I used ultra grid for most of the body (it’s a nylon with Dyneema grid reinforcement and a waterproof coating on the inside), and I found that it worked quite well. The Dyneema reinforcement is hard to get through, but it sews like a dream and holds up well. Looking around I found Venom Gridstop. Similar material, but a little thicker and with a tighter reinforcement grid, so it should be more durable. What color? They have an orange color, which looks great but can be overwhelming if I use it for the entire package. The grays are quite light with all the white reinforcement and will work well as a base for the rest of the pack. It’s not too expensive and you’ll have leftovers to use for other projects. Tick!
Front pocket
For the front pocket I chose a black scuba type mesh that I had used in another backpack. I would have loved to find it in orange, but even searching on Ebay didn’t give me any luck. Plus, I already had material I could use, which saves me money I can use down the road!
Hip belt and shoulder straps
The last pack I made, hipbelt and shoulder straps, was a light brown grille that they brought as seconds from Adventure Expert. It had a slight bias in its fabric, it also wasn’t that durable and the waterproofing coating started to delaminate. But I liked the look of the grille and I think a contrast to the main pack material will look good. Ultragrid has a pale gray that looks pretty good. I can find some bright orange hardware to really get the buckles into that transparent orange chainsaw feel.

I did the last pack with ultragrid and gridstop at the beginning of a three week hike. Halfway through, I had to tie a zipper if the shoulder strap got stuck as the seam was tearing through the mesh stop.
Back Panel
The backpack I’m building will have a frame, but a little thicker material on the back will help keep it a little stiffer. I had a good experience with EPLX400 previously (it’s a woven polyester laminate with a film backing). It’s also quite durable, 4000 abrasion cycles per ASTM 3884. I have no idea what that actually means, but it sounds pretty good! It comes in a white color that will complement the hip belt and shoulder straps.
Side pocket
The side pockets are where I can really add some color. I’m going to make a hybrid with a stretch mesh for most, with mesh at the bottom where it contacts the ground for durability and for the cable channel at the top. Venom Stretch Max comes in a bright orange with a white mesh and fits perfectly into the tech vibe.
Bottom panel
The bottom panel is a high wear area, but if I use the white EPLX it will get very dirty. I have some leftover black EPLX400 that I can use for this. I want a bottom elastic pocket and there is a dyneema elastic mesh that has a dense reinforcement grid that should have decent durability.

Main fabrics from left to right: Ultragrid, EPLX, Venom Gridstop, Dyneema stretch mesh, Venom Stretch mesh.
And those are the main textile materials of the backpack. There are many other materials and components that go into a backpack, primarily straps, grosgrain, and hardware like buckles. Most of the fabric and parts I ordered were ripstop by the roll.
In the next post I will review the details of the design and construction of each of the components that make up the pack.
PS: I promise I am not sponsored by Ripstop by The Roll.
This website contains affiliate links, which means The Trek may receive a percentage of any products or services you purchase using links in articles or advertisements. The buyer pays the same price they would otherwise pay, and their purchase helps support The Trek’s ongoing goal of bringing you quality backpacking information and advice. Thank you for your support!
For more information, visit the About page of this site.
:max_bytes(150000):strip_icc():format(jpeg)/Bruce-Willis-and-Emma-Heming-Willis-082825-612ff1e7605a49c586ff38da78f1cde3.jpg?w=238&resize=238,178&ssl=1 "Emma Heming Willis no quería que el diagnóstico de demencia de su marido Bruce Willis pareciera un ‘oscuro secreto familiar’ para sus hijas pequeñas.")


:max_bytes(150000):strip_icc():format(jpeg)/Bruce-Willis-and-Emma-Heming-Willis-082825-612ff1e7605a49c586ff38da78f1cde3.jpg?w=100&resize=100,75&ssl=1 "Emma Heming Willis no quería que el diagnóstico de demencia de su marido Bruce Willis pareciera un ‘oscuro secreto familiar’ para sus hijas pequeñas.")


